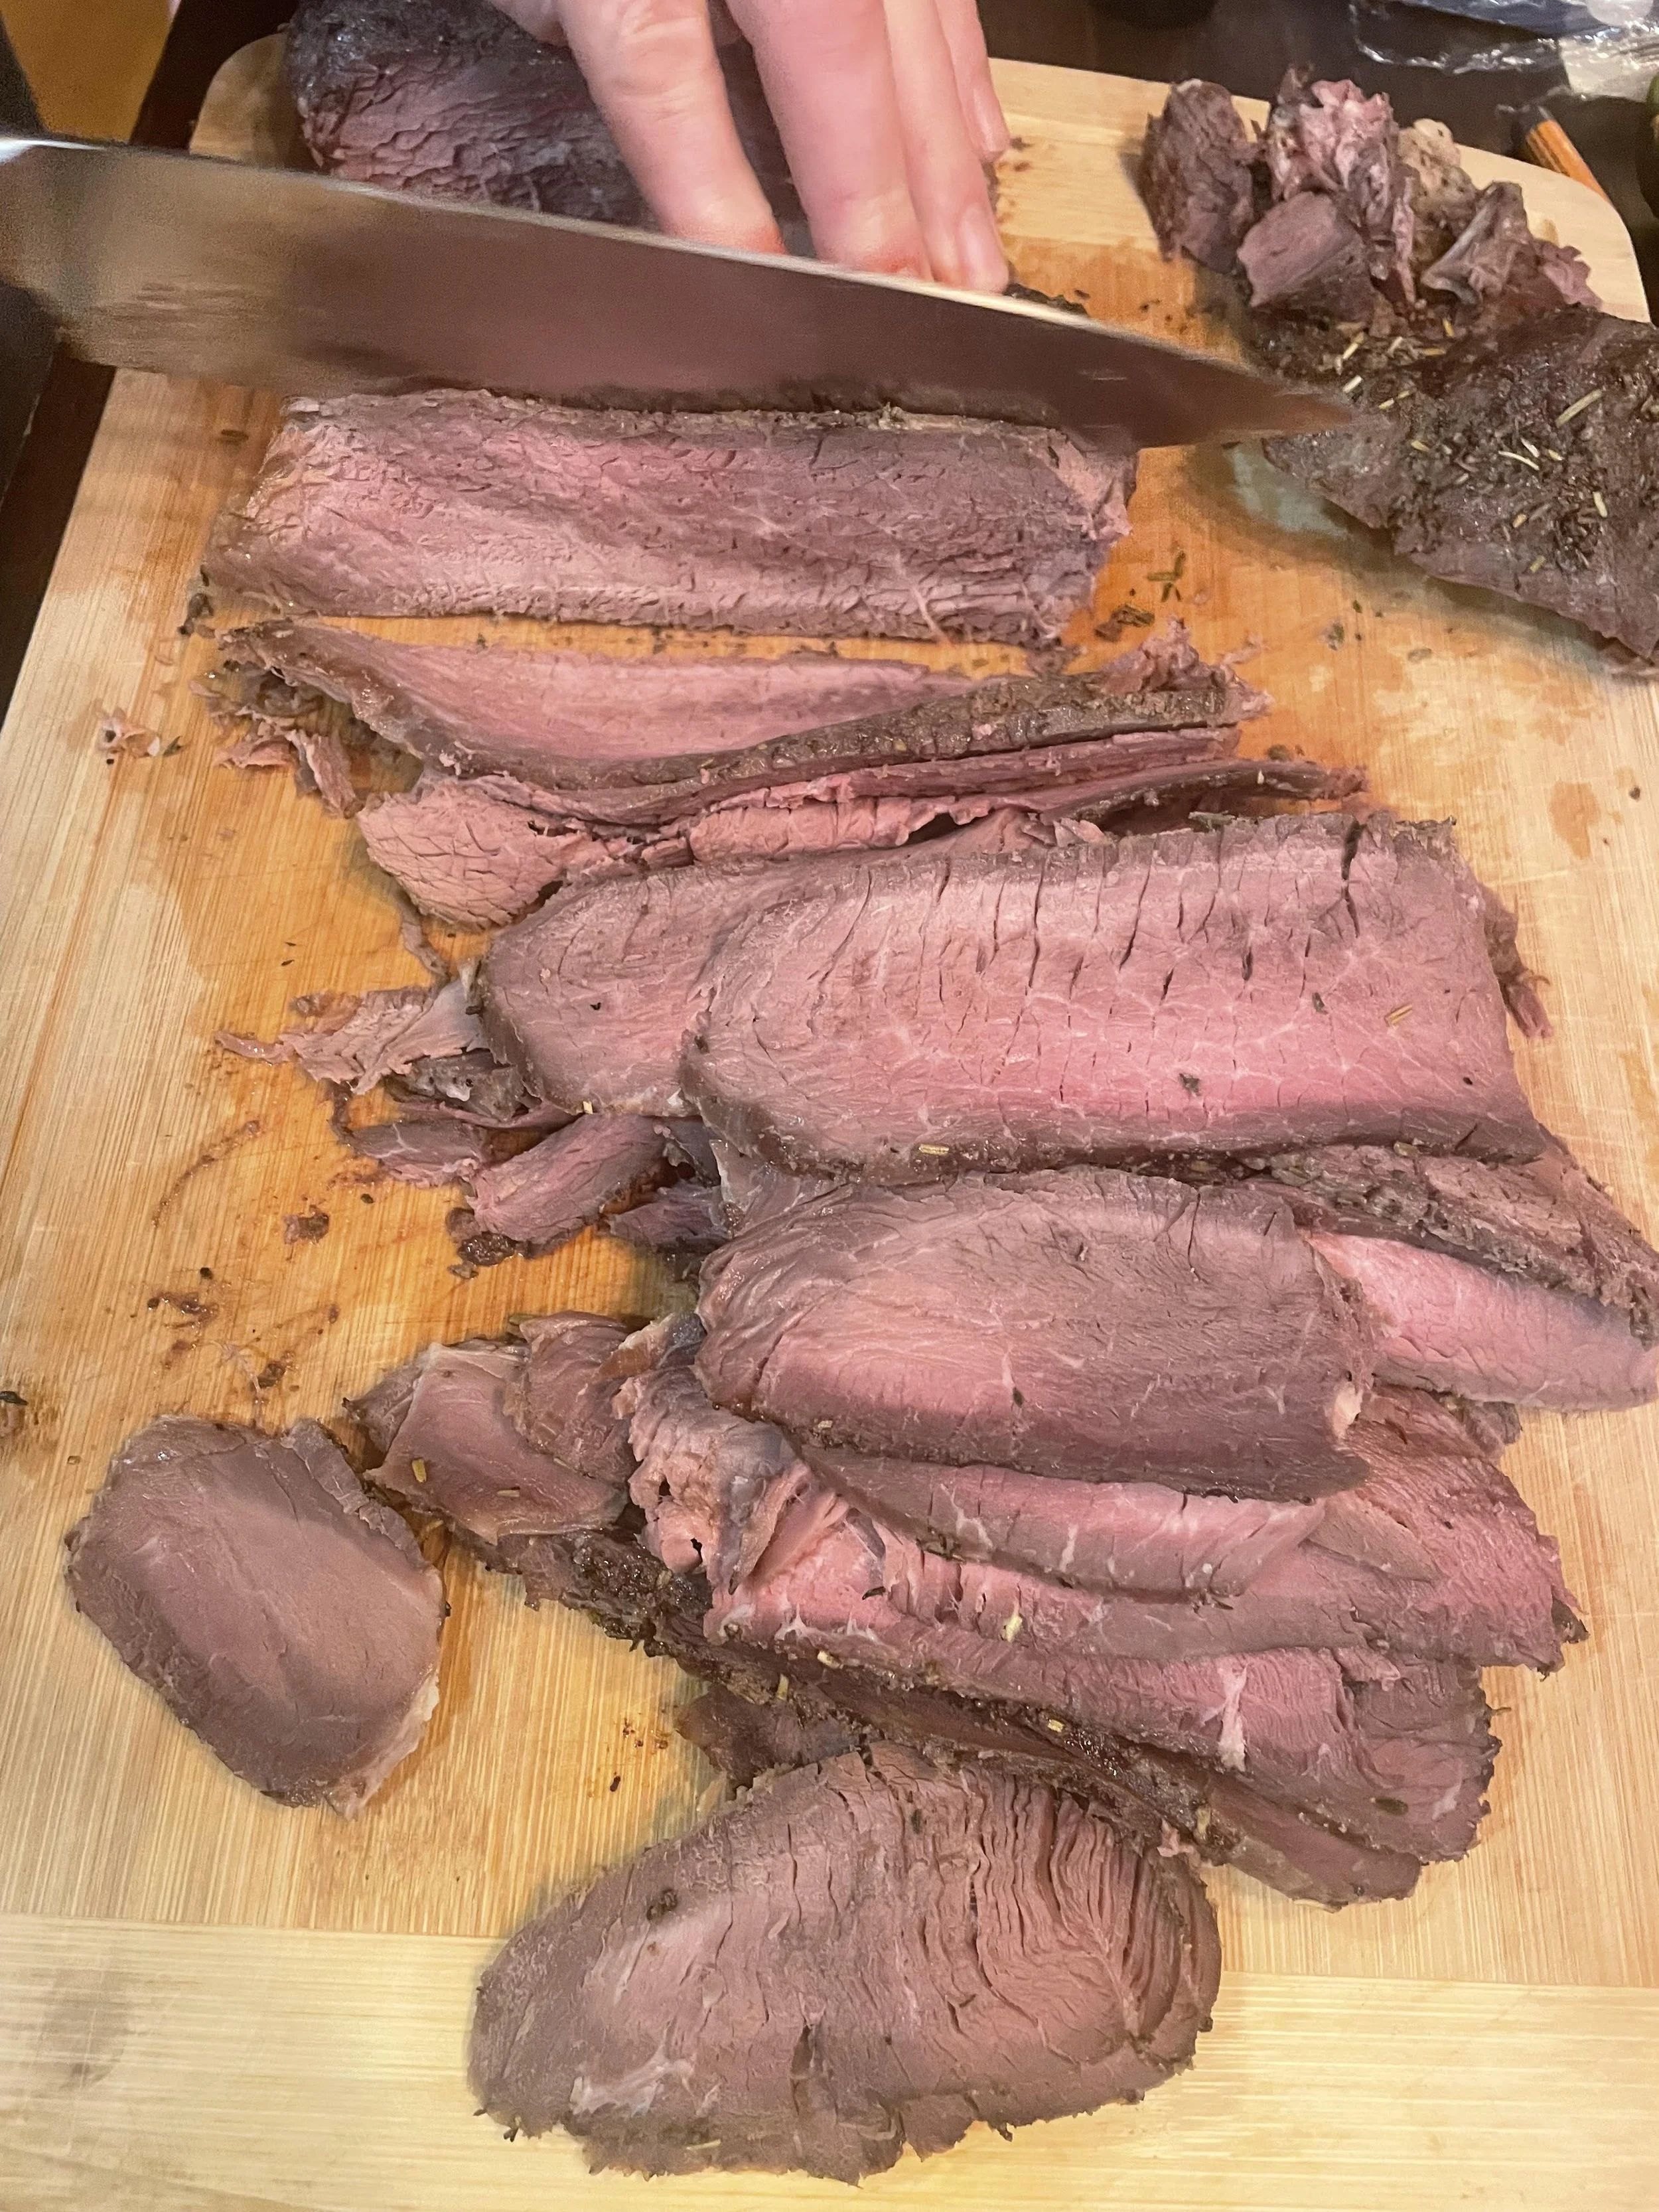
Skip processed deli meat and make real food beef lunch meat at home. This simple sirloin tip roast recipe creates nitrate-free, nutrient-dense lunches perfect for busy families and school days.
Warm, hearty, and straight from the farm, this Fall Harvest Stuffed Squash recipe features our pasture-raised sausage made with grass fed beef, pork, or chicken alongside hearty organic vegetables. We deliver across Ohio and the Midwest, or you can pick up locally in Hillsboro, Chillicothe, Waverly, or Ripley.
Ingredients:
1 pkg Grass Powered Boneless Chicken Breast, Boneless Thighs or around 1.5lb leftover cooked chicken
2 pkgs Grass Powered Chicken or Turkey Bone broth
Homemade or store bought egg noodles (measure with your heart)
3-4 stalks celery sliced
1 cup shredded or sliced carrots
1 medium onion, diced
2-3 cloves garlic minced
Salt, Pepper, Thyme to season
Optional: Add greens like chopped spinach, swiss chard, kale for an extra veggie pop!
Directions:
Dice chicken and add to deep pot or dutch oven with avocado oil. Saute until cooked through then add onion, carrots, celery and seasonings. When veggies start to soften, add garlic. Add packages of broth and let come to a gentle boil. Add egg noodles and allow to simmer covered until veggies and noodles are soft. If you need a little more liquid, add a touch of water.
Our Farmstead Bread Mix makes the PERFECT crusty loaf of bread to serve with soup too!
Here’s one of our favorite salads we have on repeat from Spring until Fall!
Ingredients:
1 Pack Grass Powered Boneless Chicken Breast or Thighs
1/4 Cup Olive Oil + Your Favorite Seasoning Blend
OR I often use a mix similar to
1/4 cup olive oil
1/2 Tbsp Dos Soles Sea Salt
1 tsp Thyme
1 tsp Black Pepper
1 tsp Garlic Powder OR 1 Tbsp Minced Garlic
1 tsp paprika
A few tablespoons of coconut aminos also add amazing flavor!
Marinate thawed chicken breasts in the marinade for at least 30 minutes. Grill to 165 degrees internal temperature. Not too much more or they’ll dry out.
Ingredients:
1/4 cup Olive Oil
1 to 2 Tbsp Balsamic Vinegar
1 Tbsp Mustard
1 Tbsp Honey or Maple Syrup
Generous pinches salt and black pepper
I typically eyeball these amounts and mix in a mason jar so I can shake it up and store any leftovers in the refrigerator. Swap the balsamic for other vinegars, change up the seasonings, this dressing is very versatile!
And to make the salad, go for local salad greens if you can find them. They are SO MUCH BETTER than what you find in the grocery store. If you’re local, we love Way Farms and Grahams Greens salad mix!
I also like to add Sierra Nevada feta cheese, shredded white cheddar or parmesan, and any other seasonal veggies like green onions and radishes and even hard boiled eggs to add some protein.
Salads don’t have to be boring!
Apple Cider Pork Roast
Ingredients:
2-4lb Grass Powered Pork Roast
1 cup apple cider
1/2 cup apple cider vinegar
1/4 cup brown sugar (could increase to 1/2 cup for bigger roasts)
1 Tbsp Paprika
1 Tbsp Garlic Powder
1 tsp Cinnamon
1/2 tsp black pepper
1/2 tsp cloves
1/2 tsp nutmeg
optional - substitute 2 tsp pumpkin pie spice for the cinnamon, cloves and nutmeg!
Instructions:
Rub the pork roast with all the spices.
Place the roast in a crockpot with the apple cider, apple cider vinegar and brown sugar.
Cook on low for 8-10 hours or on high for 4-5 hours until the pork is tender and shreds with a fork.
Mix the shredded pork with the cooking liquid.
Serve over mashed potatoes, on buns with coleslaw, with cheesy grits, or just sneak bites straight from the crockpot!
Optional: This can also be made in the oven if you have a love/hate relationship with the crockpot like I do. I will say, this is one recipe I make in the crockpot and it turns out amazing!
Oven Instructions: After covering the roast in all the spices I brown the roast in a bit of lard, butter, or avocado oil, add all the liquids and brown sugar, then cook on 275 for a few hours in the oven with the lid on.
If you’d like to save $$ and stock your freezer with a pork roast + juicy thick cut pork chops, sausages, and even our new bacon - grab one of our Pastured Pork Packs from the Online Farm Store!
Want more recipes like this plus behind the scenes stories from your farmers? Join our email community below!
We all want to feed ourselves and our families well, but sometimes the price of local food can cause sticker shock compared to grocery store prices.
I get it, the upfront cost seems higher, but when we actually break down the cost, eating a homecooked meal made with quality local ingredients is cheaper than even a fast food value meal.
Plus the nutritional value is not even close to comparable!
I broke down what it costs to make a few of our simple go-to meals, starting with roasting a whole chicken. As we use up leftovers and bone broth from that one chicken dinner, the cost of the meals we can create becomes lower and lower.
Full disclosure - I didn’t break down the costs of everything like spices and oils and electric/gas to cook with. Use this info with an open mind and plug in your own recipes and costs!
These meals build on each other to use up any leftovers from prior meals. I’m not a person who likes to eat the same leftovers day after day, so I try to repurpose them into different meals. These meals look repetitive, but just so you can see multiple options for using up the same leftovers.
It’s always an option to freeze things like shredded chicken, the broth from your roasted chicken, or soup made with your homemade broth to have quick meals another day. We just want to do our best to use up all the leftovers and not waste food. Those savings add up!
Also, I created these recipes as if I was going to make them today, in April, when local tomatoes and sweet corn aren’t available. I highly recommend including local fresh veggies when they’re in season!
Ingredients:
1 Whole Grass Powered Chicken $28
2lbs Potatoes $3.50
1 Bundle Asparagus $3
Total Cost $34.50
Total Cost for Family of 4 = $8.65/person
Don’t waste those bones or leftovers!
Turn the bones into homemade broth (we usually end up with about 4 quarts from each chicken) to use in soups and freeze some for later too.
Shred any leftover chicken off the bones and either freeze, or use in more meals through the week.
If you’d like my Bone Broth making guide, here’s a link to have it sent to your inbox!
Ingredients:
leftover shredded chicken from Meal #1 $0
1 bag local salad mix $5
1 bunch local green onions $2
1 box local cilantro microgreens $5
1 box cherry tomatoes $5
1 can sweet corn $ 1.79
1 can black beans $1.79
2 avocados $3
Total Cost $ 23.58
Total Cost for Family of 4 = $5.89/person
Ingredients:
Leftover Shredded Chicken from Meal #1 $0
OR 1 pkg Grass Powered ground beef $12
Taco Seasoning $3
Taco Shells or Tortilla Chips $7
Shredded Cheese $3
Leftover lettuce, beans, corn, tomatoes, cilantro, green onions, etc. from Meal #2 $0
Total Cost $25
Total Cost for Family of 4 = $6.25/person
Any leftovers from this meal make amazing quesadillas for a quick and easy lunch!
This could be made in place of the salad or tacos, or used as a way to finish up leftovers from either option!
Chicken Tortilla soup is just one of so many options. You could make chicken noodle, chicken and rice, any different version of chicken soup that would use up shredded chicken and some of your homemade broth.
Ingredients:
leftover shredded chicken from Meal #1 $0
1 quart broth from chicken in Meal #1 $0
1 onion diced $1
1 pepper diced $1.50
1 can diced tomatoes $1.79
1 can black beans $1.79
1 can sweet corn $1.79
**toss in any leftovers from salads or tacos
Leftover shredded cheese, green onions, cilantro microgreens, tortilla chips as toppings $0
Total Cost $7.87
Total Cost for Family of 4 = $1.96/person
Most soups freeze really well. Toss this in the freezer and it’ll be there for a quick lunch or dinner when you’re ready for it!
This is one of our favorites for lunch!
You can also toss in shredded chicken to add a little more protein and mix up the veggies if you have something else on hand to use up.
Ingredients:
1 quart chicken bone broth from Meal #1 $0
about 6 medium potatoes $2 (use up what’s left of the bag from Meal #1)
2-3 carrots $1.50
1 bag frozen organic broccoli florets $2 (optional)
1 onion $1
about 2 cups milk or half & half $2
Total Cost $8.50
Total Cost for Family of 4 = $2.13/person
Creating amazing meals from local foods doesn’t have to be difficult, expensive or take a lot of time. Simple meals with basic ingredients will nourish your family just as well as anything extravagant.
If you want to gain more confidence and experience cooking this way with local foods, I encourage you to join us as a Monthly Meat CSA member.
As a Meat CSA Member we will build a custom bundle of our meats for your family every month then guide you through preparing amazing meals using our meats + fresh, seasonal ingredients.
Want recipes, restock alerts and stories from the farm delivered straight to your inbox? Add your first name and email address below and be part of the in crowd!
1. Stock the Goods
Even if meal planning isn’t your thing, having a freezer full of meats and veggies plus some pantry staples means you can put a healthy meal on the table, fast.
Bake or pan cook a pack of our pastured chicken thighs, make a quick batch of rice or quinoa and a bag of frozen veggies - dinner!
Being part of our Monthly Meat Share makes this extra easy. I’ll stock your freezer once a month with our homegrown meats, then you’ll just need to shop for side dishes!
2. Invest in Quality Kitchen Tools
There’s nothing more frustrating than trying to cook without the proper tools!
A couple sharp knives, a meat thermometer, a cast iron skillet and my Dutch oven or Crockpot seem to be my most used kitchen tools.
I’ve also heard amazing things about the Instapot and airfryers too. If you use them a lot I’d love to hear more about how they save time you and effort cooking!
3. Keep it Simple
Feeding your family real food doesn’t mean you need to transform overnight into a gourmet chef, just keep it simple!
A meat and veggies, that’s all you really need. Extra sides are a bonus!
Also - we don’t need to cook different recipes all the time. If you find a few simple meals your family enjoys, don’t feel bad about making them every week or even more often.
I’ve even heard of families who cook the same rotation of meals on the same night every week. I don’t go that extreme, our days are too random and I’d get bored, but it would make shopping and meal planning so much easier!
4. Plan Ahead - Or Not
When I’m on top of my game, I’ll have at least a general idea of what I’m planning to cook for the week ahead of time. That doesn’t always happen though.
I have found success when I pull a few packs of meat from the freezer on Sunday evening and as the meats thaw through the week, I create a meal around them.
When I’m really organized I’ll pull the meat for tomorrow’s dinner out the night before to thaw, and maybe even chop the veggies to speed up the cooking.
Sometimes I’ll pop dinner into the crockpot during breakfast so it’ll be ready at the end of the day.
Most of the time though, I’m quick thawing frozen meats in a bowl of cool water an hour or so before I start cooking dinner and making up a meal on the fly with whatever I have on hand.
It might feel impossible now, but once you start spending more time in your kitchen creating meals from local foods it becomes so much easier to make up meals!
5. Leftovers are Life
I’m a huge fan of cooking once then turning leftovers in to new meals.
Cooking a few times a week then simply heating up leftovers on busy nights is a great strategy for avoiding the drive thru line between activities.
Most of my family will eat leftovers fine, I tend to be the pickiest about eating the same thing multiple times, so I try to create something new with the leftovers.
Meat from a whole roasted chicken can easily be stretched into multiple dinners - especially if you make broth with the bones!
Soups from leftover chicken, broth and veggies, crumble leftover meatloaf into spaghetti, leftover taco stuff into quesadillas, leftover beef roast into beef and noodles or vegetable soup - get creative!
6. Freezer Meals
When I have an open Sunday afternoon, I like to spend it in the kitchen whipping up freezer meals for the week or month ahead.
Muffins, breakfast burritos, bone broth, soups and stews, and cooked shredded meat are all great options to have on hand! Most will also freeze well to be heated up on the busiest days.
Making a homemade chicken noodle soup could be as simple as adding a quart of frozen broth, a couple cups of frozen shredded chicken, a bag of frozen mixed veggies, then adding your favorite noodles to cook right at the end.
7. Give Yourself Grace
Life and feeding our families well is about balance.
Don’t feel like a failure if you find yourself exhausted, without a plan, and ordering pizza or making a box of mac n cheese on a random Tuesday night.
Dust yourself off and try again on Wednesday!
I’m adding an 8th thing in here, because I just feel like it needs to be said - your meals don’t need to look like they do on Pinterest to be healthy, filling, and taste amazing.
As a matter of fact, nothing in our lives needs to look Pinterest worthy to be perfect. We gotta let those expectations go!
We’d love to help you stock your freezer with pasture-raised and grass-fed meats so you’re ready to create healthy meals.
Head into the Online Farm Store here to see what we have in stock, or pop out to visit us in the farm store Sunday afternoon from 1-3pm or Tuesday evenings from 5-6pm.
If you aren’t already on our email list, it’s the place to be! Be first to know when we open up Monthly Meat Share spaces and send out stories and recipes from the farm. You can unsubscribe at any time, but we’re pretty sure you’ll want to stick around!
I know beef roasts tend to be known as a classic Winter meal.
Pot roast and potatoes is definitely something we love on a cold Winter evening, but beef roasts are one of my favorite summer meals too.
We tried something new this week and made a super, super simple version of beef barbacoa in the crockpot, added some fun fillers, and it made the BEST burritos!
In summertime we do quite a bit of grilling, but the crockpot is another great way to keep the house a little cooler while still eating an amazing homecooked meal.
Here’s my quick and easy version of summer beef barbacoa burritos!
1 Grass Powered beef shoulder roast
1 can chipotle peppers in adobo sauce
2 cups beef broth
4-6 small potatoes
1 onion
Tortillas, rice, quinoa or tortilla chips to create a wrap or bowl
favorite toppings - tomatoes, cilantro, radishes, avocado, red onion, sour cream, cheese
Add your thawed beef roast to the crockpot with the broth and can of chipotle peppers. If you have a little extra time, add more flavor by seasoning the roast with salt, pepper and a touch of cumin, then brown the roast on all sides in a cast iron skillet. I didn’t brown the roast before adding it to the crockpot, so it’s not absolutely necessary!
Cook the roast on low for 6-8 hours until it shreds easily.
Cut the potatoes into approximately 1 inch cubes and slice the onion into thin wedges. Add enough olive oil to coat lightly and season. I used salt, pepper, and chili seasoning - but smoked paprika, a bit of chili powder, or garlic powder, would all be great options too!
Roast the potatoes at 425 degrees approximately 40 minutes or until they are soft inside and lightly browned.
Prepare your favorite toppings
You’re ready to eat! Layer on beef, potatoes and onions, and all your other toppings and enjoy a locally raised, nutrient dense meal!
If there are leftovers, these will make delicious sheet pan nachos for lunch or dinner the next day :)
Want more recipes like this along with stories from the farm straight to your inbox? Add your name and email address below and we’ll add you into our email community!
I’ve been in a major cooking rut most of this Spring, but I ran across this recipe idea and knew we had to try it!
It’s my favorite kind of meal - super quick and simple, with simple ingredients, but the flavors come together to make it seem like a way fancier meal than it actually is.
And all but the rice can be grilled outside, so it’s perfect for hot summer evenings when you don’t want to heat up the house cooking indoors.
Note - we used boneless chicken thighs in our bowls, but you can definitely use any other bone-in or boneless chicken cut or even ground chicken cooked in a skillet. I think pork would also work well here too.
Recipes are only suggestions, use what your family likes best or what you have on hand - it’ll still turn out great!
We also made Hawaiian chicken burgers using our unseasoned ground chicken patties with the roasted red peppers and pineapple as toppings and they were AMAZING.
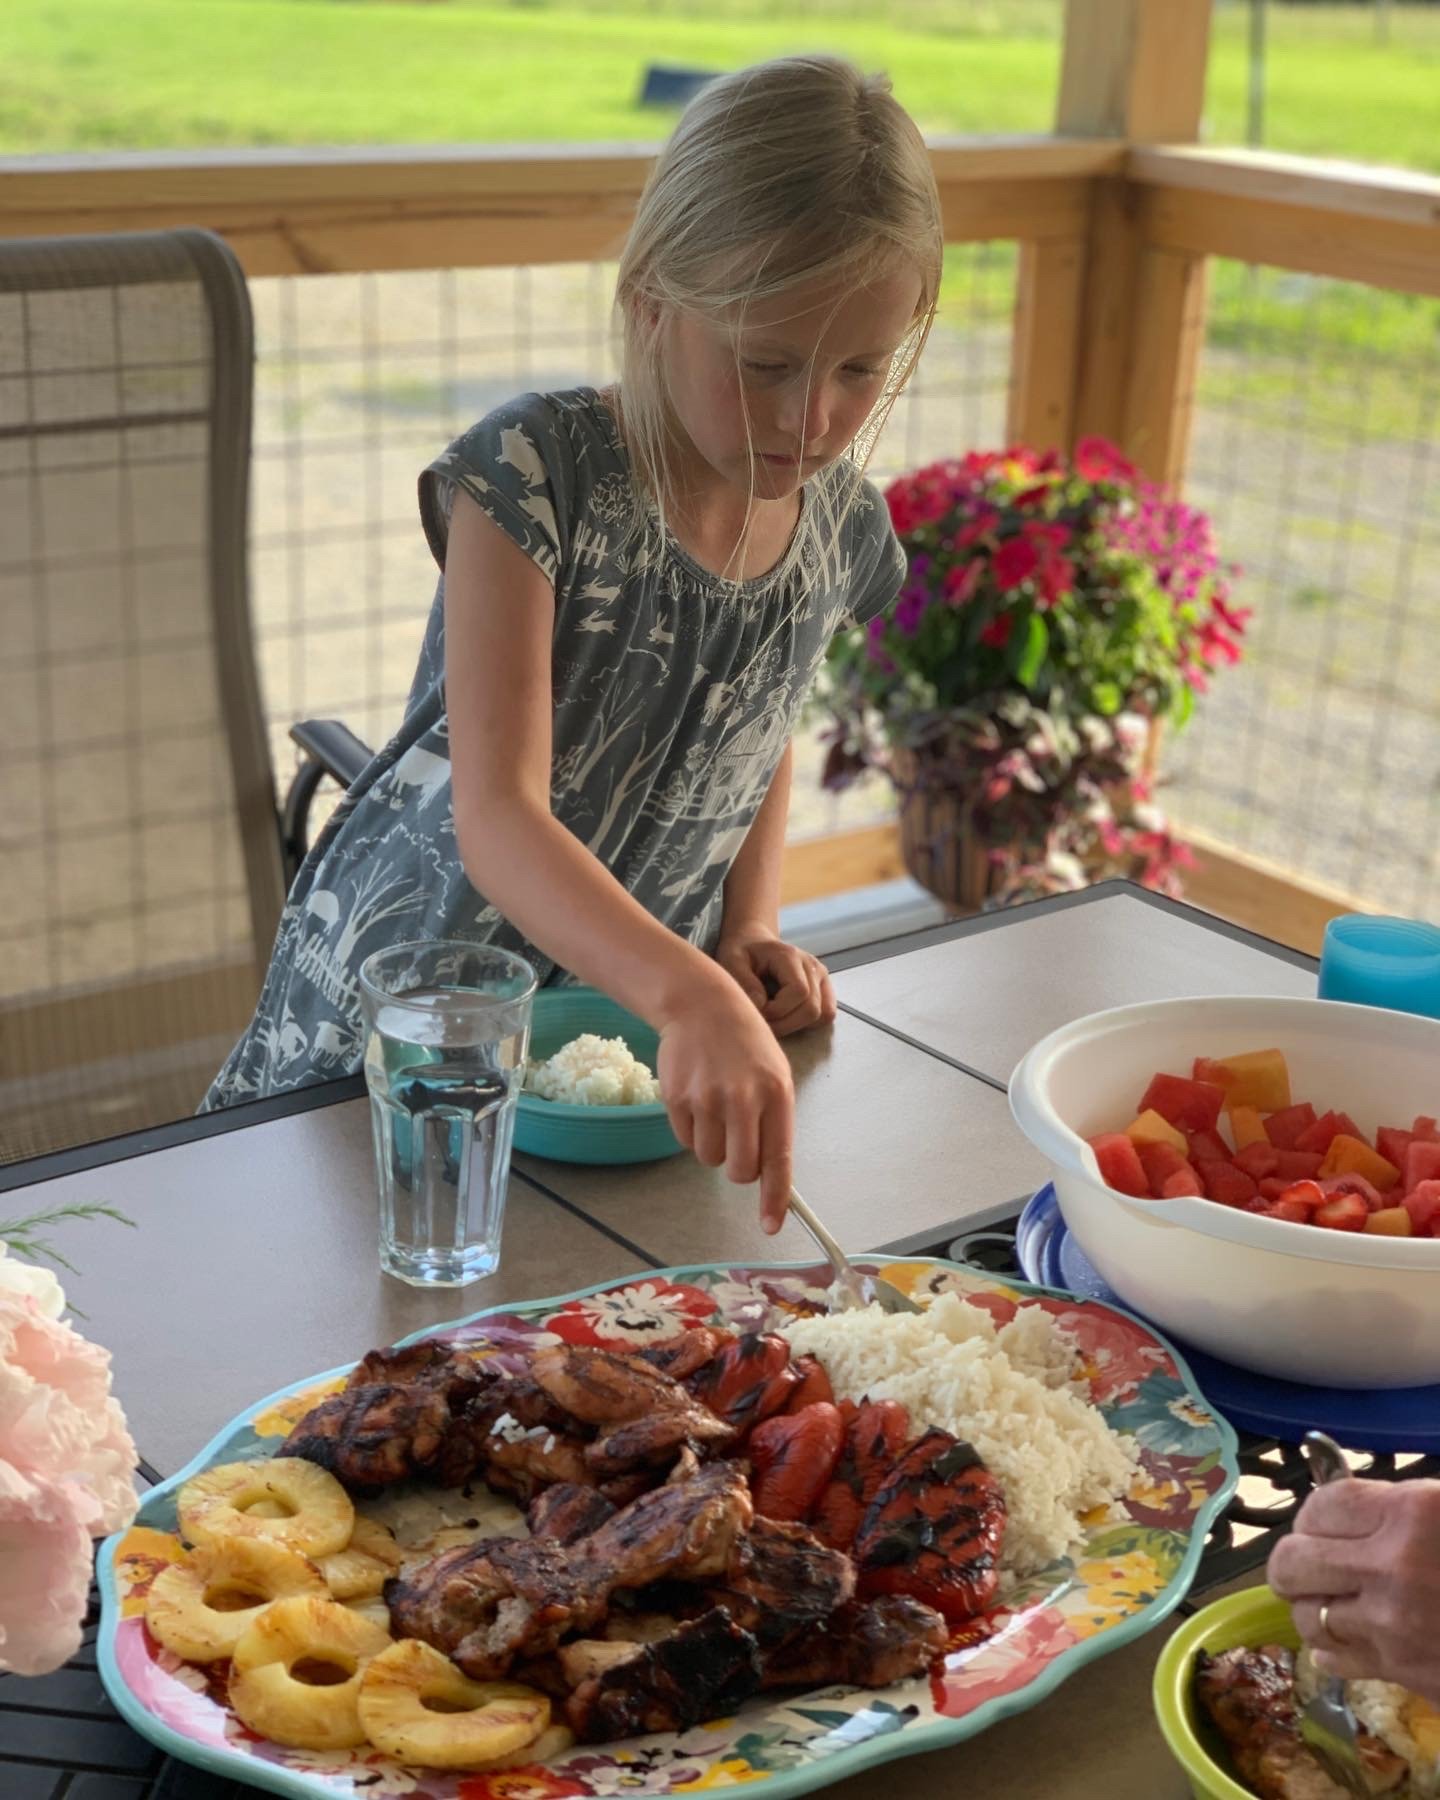
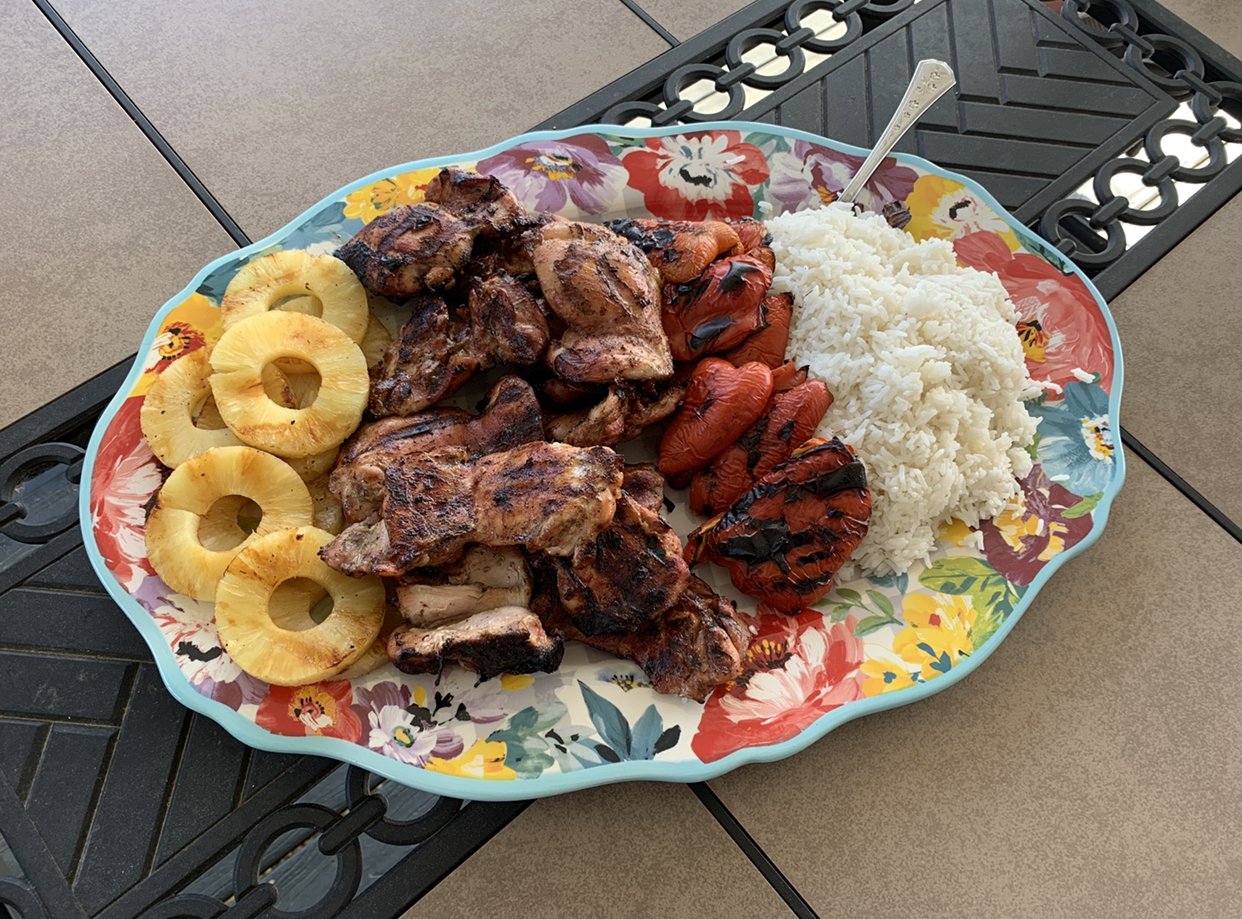
1 package Grass Powered boneless chicken thighs (or see note above for other ideas!)
1 batch coconut rice (see below)
2 red bell peppers
1 can pineapple slices or 1 fresh pineapple sliced
1 red onion (optional)
Coconut aminos, salt, pepper, garlic powder to marinate the chicken
2 cups jasmine rice
1 can coconut milk
1.5 cups water or bone broth
1 tsp salt
1 tsp sugar (optional)
Rinse rice in a fine mesh colander until water runs clear then add to a saucepan.
Add coconut milk, water, salt and sugar to a pot and bring to a boil.
Turn the heat down to low and cook covered for 20 minutes.
Fluff and serve when you’re ready!
.25 cup olive oil
4 Tbsp coconut aminos
1 Tbsp lemon or lime juice
1 tsp minced garlic
1/2 tsp salt
1/2 tsp black pepper
1/2 tsp onion powder
pinch of red pepper flakes
Marinate your thawed (or at least mostly thawed) chicken in the chicken marinade for at least 30 minutes, or up to overnight.
Cut each pepper into about 3 slices and the onion into round, flat slices (think like the shape of a burger patty). Have a can of pineapple slices or your fresh pineapple slices prepared.
Prepare your coconut rice, or if your family isn’t into coconut make regular rice with bone broth instead of water to give it some extra flavor and nutrition!
Grill your veggies and pineapple slices first until they’re softened. I like ours with a little char to them.
Once the veggies are ready, move them off the heat and add your chicken to the grill. Cook until the internal temp reaches 165 degrees.
Assemble the bowls by layering rice, chicken, veggies and pineapple. I like to drizzle mine with a little extra coconut aminos for serving too.
Even our kids LOVED this recipe, especially Eliza who was standing beside the grill with her bowl anxiously waiting to eat!


Want more recipes like this along with stories from the farm delivered straight to your inbox? Join our email farm community below! It’s the best way we’ve found to share our lives here on the farm.
Even in Winter, we're always looking for ways to eat local and use what's available at our farmers market! This Buffalo Chicken Dip is a Chillicothe Farmers Market style twist on classic appetizer dips.
I can’t wait to make it on Sunday while I pretend to watch the Super Bowl! :)
Ingredients:
1 pkg Grass Powered boneless chicken breast - cooked and shredded
1 bag Way Farms Spinach - chopped into smallish pieces
1 can artichoke hearts diced (optional)
1/2 cup Chillicothe Sauce Company sauce - we recommend Red Hot Griff for this recipe, but any of their options will work well!
1 pkg cream cheese - softened
1/2 cup blue cheese or ranch dressing
1/2 cup crumbled blue cheese or shredded mozzarella
Dipping vessel of choice - fresh veggies, pita chips, crackers, whatever you like!
Steps:
Preheat your oven to 350 degrees and use butter or non-stick spray to prepare your casserole dish.
Combine shredded chicken, spinach, hot sauce, cream cheese, dressing, cheese and artichokes (if you're using them) and spread into your casserole dish.
Bake until it's all bubbling and hot, usually about 20-30 minutes.
Give it a stir and serve hot!
Want stories and recipes from the farm delivered straight to your inbox? Join us!
This breakfast casserole needs very little introduction.
I first made this for my family on Christmas and everyone loved it.
I knew Christmas morning would be a flurry of wrapping paper and excited babies and I didn’t want to miss a moment!
I assembled the casserole the night before, then popped it into the oven to cook while the girls were opening presents. By the time they were finished, it was ready to eat!
I’ve made this multiple ways now. I’ve added sautéed onions and peppers to include a few veggies. Shredded zucchini would be easy to hide with the potatoes. I’ve used 1 pound or 2 pounds of sausage depending on how many people I needed to feed.
I change up what kind of sausage I add too. This week I used Red Pepper pork sausage and it added amazing flavor! I also think Jalapeno pork sausage would be fantastic in this, it gets just a tiny bit spicy for my kids though.
I like to make this on Sunday morning, then we eat it for breakfast (or sometimes lunch or snacks) throughout the week.
Homegrown Breakfast Casserole
1 or 2 pounds of Grass Powered sausage (pork or chicken, any flavor, 2lbs makes it heartier for a big crowd)
1 bag hashbrown potatoes or about 4-6 potatoes shredded
1-8 oz block Monterey Jack cheese shredded (or your favorite cheese, or leave it out!)
8 Grass Powered pasture-raised eggs
1.5 cups whole milk, heavy cream or half and half (any combination works)
Butter for cooking the hashbrowns
1 tsp ground mustard (optional)
Salt/Pepper to taste
Preheat oven to 350 degrees and prepare a casserole dish with your favorite non-stick spray or oil
Brown sausage in a skillet and set aside
Brown hashbrowns in the skillet then transfer into the casserole dish and press down a bit to create the bottom layer
Top hashbrown layer with browned sausage
Top sausage with the cheese.
Scramble the eggs, milk and spices together then pour over top of the casserole layers.
If you aren’t ready to bake, cover the casserole and refrigerate.
Cover and bake for approximately 45 minutes (check the middle to make sure the eggs are done all the way through). If baking the refrigerated casserole it will take longer to bake.
Enjoy! Sometimes we go crazy and serve this with a few drizzles of maple syrup… it’s a perfect sweet and spicy combo!
If you’ve invested in a high quality, pasture-raised Thanksgiving Turkey, you’ll want to enjoy every ounce of goodness that bird can provide!
After the Thanksgiving feast, once all the leftovers are picked from the bones, there’s one more way that turkey can nourish your family - bone broth.
Bone broth is as simple as taking the bones from your turkey (or chicken, beef, pork, etc) and simmering them in water to allow the nutrients and flavor to leach from the bones into the broth.
Our family then uses the broth as a base for our soups, instead of water when we make rice or quinoa, and while it’s not always my favorite way to use it, I’ve been known to sip a mug of warmed broth if I’m recovering from any kind of sickness.
Lots of recipes overcomplicate this process, but it doesn’t have to be this way!
I typically make bone broth in a large turkey roaster so I can simmer once and create around 10 quarts of broth for the fridge and freezer, but the crockpot, Instapot, or just a regular pot on the stove also works great.
I don’t usually follow any exact recipe or measurements - this is one of those things you can’t mess up!
To make the broth you’ll want to add the turkey bones (you may need to break them up a bit) to whatever vessel you’re cooking in and cover with water. I typically add a quartered onion, a few stalks of celery, a few carrots and cloves of garlic, along with a splash of apple cider vinegar, salt and pepper. Depending on how fancy I’m feeling, sometimes I’ll also toss in some thyme, rosemary, turmeric, and even a hint of ginger.
I bring the batch of broth to a strong boil, then lower the heat so it’s just quietly simmering.
The trick to making amazing broth is letting it simmer long enough to get a deep, rich flavor. It takes awhile!
If you’re cooking on the stove it can be done in as little as a few hours, but if you’re using the crockpot or turkey roaster, I like to let it simmer 24+ hours. Sometimes you’ll need to add a bit more water during the process, so keep an eye on it!
After your broth is finished, you’ll strain through a fine mesh strainer or through a regular strainer lined with cheesecloth. Once it cools a bit, ladle into your storage containers.
I typically leave a couple quarts in the fridge, but the rest I’ll package into plastic quart containers and freeze until I need them. I have frozen in glass jars before too and it’s been fine, just leave plenty of head space!
Note - if you’re worn out from cooking the Thanksgiving feast and not ready to immediately take on broth making, you can also toss the bones into a freezer bag and hang onto them for a bit!
I hope you have a WONDERFUL Thanksgiving with your family and that your turkey provides many delicious meals and leftovers in the weeks to come!
This recipe is DEFINITELY one you will want to try out this Winter. It’s tasty, filling, and an easy way I can get bone broth AND greens into all of us without any resistance.
Jesse has proclaimed it his absolute favorite soup ever and in the top 5 of his favorite meals, and even our 2 year old who tends to be fairly picky will clean up bowl after bowl of this soup.
It seems like such simple ingredients, but there’s something about it that comes together to be so good!
I also really like this soup because 100% the ingredients can be purchased locally without even stepping into a grocery store. It feels amazing to craft a meal with ingredients that were raised on our farm, or came from our farmer friends!
We like to serve it with a fresh baked loaf of crusty bread, or some fresh rolls or bread from the farmers market plus a touch of parmesan cheese sprinkled on top.
Ingredients:
1lb Grass Powered pork or chicken sausage - any flavor is great! Chorizo or Hot Italian for a bit of spice, or any mild sausage is perfect if you’re feeding young kids
1 medium onion, diced
2 cloves garlic, diced (or skip and spice it up with garlic powder)
4 cups homemade or Grass Powered bone broth (store bought chicken or beef broth works too)
About 5 medium potatoes cut in half lengthwise then sliced into 1/4”ish thick slices (or just chunk them up, it’ll be fine)
1/2 cup cream or 1 cup whole milk (don’t be afraid to add more or leave it out completely depending on preference)
2 cups greens - kale, spinach, chard, whatever you have on hand. Remove thick stems and roughly chop
A few sprinkles of our Farmstead Seasoning, or Salt/Pepper plus optional Onion Powder/Garlic Powder/Red Pepper flakes to taste
Parmesan cheese for serving (optional)
Steps:
Brown onion and sausage in a dutch oven or pot until onions are soft and sausage is cooked through. I usually like to brown the sausage until it’s a bit crispy but it’s totally up to you! Add the garlic in the last couple minutes of browning time. Add broth and potatoes then let simmer with a lid on the pot until the potatoes are tender. Remove the pot from heat, add the greens and stir until they have wilted. Last step is adding the cream or milk and adding spices, giving it a quick stir and you’re ready to eat!
Options: Sometimes I like to thicken up the soup with a bit of instant mashed potatoes (it does ruin the 100% local ingredient vibe, but helps my tiny human get more into her mouth and less spilled down the front of her shirt). And as I said in the recipe, you can substitute any kind of sausage and greens into this recipe. We’ve tried all kinds of variations and they all come out delicious!
Quick Tip: If you forget to thaw the sausage ahead of time, no worries. If you have an hour or so before you start cooking, place it in a large bowl of cool water. It’ll thaw fairly quickly, just make sure you cook it that night! You can’t pop it back into the freezer or fridge for another day after quick thawing this way.
Or, you can unwrap it straight from the freezer and place it in your pot on low heat. A lid helps speed things up. You may also need to add a touch of oil or lard to keep it from sticking. As it thaws, peel back the thawed parts and break it all up as it thaws and softens. It takes a little longer this way, but it’ll cook up just fine!
If you’d like more recipes from the farm delivered to your inbox or to learn how you can purchase the ingredients needed, click the link below to join our email community!
It’s no secret - I love baked goods. Except oatmeal raisin cookies. I also did not have a pleasant fruit cake experience so it’s a no go on those, but other than that I’m a pretty equal opportunity baked good eater.
When I have a little extra free time to play around in the kitchen I like to try and “healthify” some of our favorite baked goods.
Jesse usually tells me they are “just ok”, then proceeds to eat 3/4 of a pan of whatever it is. Eliza is all about a sweet treat so I don’t think she even tastes it long enough to know it’s a healthier version of anything. I’m with Eliza, I have liked most of the experiments.
These paleo brownies were my latest attempt at a healthier version of one of our favorites. They are super dense, fudgy, chocolately, and have no processed sugar. Well, I take that back, there is a little bit of sugar in there - I added a couple tablespoons of whatever the Simple Truth dark chocolate chunks are from Kroger. If you’re a strict paleo eater - leave out or substitute whatever you’re comfortable with!
I really liked these, so hopefully you do too!
Adapted from a recipe I found on realfoodwithjessica.com
1/2 cup coconut oil
1/2 cup cocoa powder
3/4 cup raw honey - I used Pap’s Hilltop Honey
2 Grass Powered pastured eggs - room temperature
1/4 cup coconut flour
1 tsp vanilla
1 tsp espresso powder - might leave this out if the tiny humans will be eating these. Trust me.
Dash of sea salt
1-2 Tablespoons dark chocolate chunks - unsweetened chocolate would make them actually paleo!
Preheat oven to 350 degrees. Either grease a baking sheet or line with parchment paper and then spray. I used a 6”x9” pan so the brownies would be thicker, but you could also use a typical 9”x9” pan or even go crazy and make brownie bites in a regular or mini muffin pan. Keep in mind these brownies won’t really “poof” much.
In a medium saucepan, melt the coconut oil and add the cocoa powder. Whisk it together so it doesn’t have lumps.
Remove from heat and add the honey. Once it’s mixed in, add the eggs and vanilla.
Add in the coconut flour, salt and espresso powder. Mix until it’s all smooth then add the chocolate chunks.
Side note - if you mess up the order in any of this, just go with it. They’ll still be great.
Bake for about 20-25 minutes for a 6”x9” pan, but probably only about 15-20 minutes if you’re using a bigger pan or muffin tin. You’ll be able to tell they’re done because the middle goes from shiny goo to looking just a tiny bit poofed and more solid. I know that’s vague, but you’ve got this.
Try not to burn your tongue tasting them straight from the oven. If there’s anything left at the end of the day, stick them in the fridge to last longer.
The next recipe I want to try is a paleo pumpkin bread. It looks SO GOOD. Will let you know one we experiment with it!
My Mimmie was such a cool lady. Not a day that goes by I don’t wish she was sitting in my rocking chair with a great grand baby on each knee or on the other end of the phone line laughing at all the stories I could tell her about my life now.
One particularly fun memory I have of her was right after she bought a new mini van. She loaded up my sister and I plus our cousins and took a trip to town. On the way home, out of nowhere, she announces “lets see what this thing can do!”, floors the gas pedal and we go flying down a little back road.
I mean, it was a mini van so we couldn’t possibly have gained speed that quickly, but it felt really fast!
The railroad tracks were quickly approaching, we were all plastered to the seat backs screaming and Mimmie was just laughing! She eventually slammed on the brakes at the last minute and we made it home safely. We all tripped over each other trying to get in the house first to tell Pappap we almost ramped the railroad tracks Dukes of Hazard style.
Along with being the coolest and most fun Grandmother ever, Mimmie was an amazing cook and loved feeding anyone and everyone.
Big holiday dinners with Mimmie were AH-MAZING! We had the turkey, usually a ham, all the usual sides, 10 kinds of cookies and pies, but our absolute favorite thing she made was her homemade noodles. Our family still calls them “Mimmie Noodles”.
All of us kids would find reasons to sneak through the kitchen and steal a few noodles off the counter before they made it into the pot. She let us snag a few, but then would start swatting at us with her spatula to save enough for dinner.
Oh and if anything ever went wrong in the kitchen her usual curse words were “oh spatula!” A solid 75% of my memories of her she had flour covering most of her body too. Oh how I miss her!
I don’t know why, but noodle making was one activity I never helped her with. After she passed away I realized I had no idea how to make them! Thankfully my Mom and Aunt took good notes.
Turns out it’s fairly simple - eggs, flour and salt is all it takes! The actual “recipe” she used involved adding enough flour til it had the right feel plus a hand of salt, but I’ve tried to recreate the recipe with some actual measurements.
2 Eggs (Grass Powered pastured eggs make the best noodles!) :)
2 Cups Flour
1 tsp Salt
Ok, now keep in mind these measurements are very approximate, but this should get you pretty close!
Add flour and salt to a mixing bowl - whisk together
Make a little hole in the middle of the flour and add in the eggs. Use your finger, or a whisk if you’re not into playing with your food, to scramble up the eggs a little bit then combine the flour mixture and eggs.
Mix until the dough holds together. You’ll have to get your hands into the dough for this step! If it’s super sticky, add a tablespoon or so of flour at a time until it comes together and isn’t sticking to your hands. Sometimes you’ll need to add a teaspoon or so of water at a time to help it hold together better. I know it sounds complicated, but I promise once you start working with the dough you’ll know what it needs!
I’ve never owned a pasta maker, but if you have one it can be rolled through it. We roll them out by hand Little House on the Prairie style!
Add a little flour to your counter where you plan to roll, plus a little on the rolling pin and dusted over the top of your noodle dough. Roll out the dough fairly thick if you want dumpling style noodles, or thinner if you want dainty little noodles. ThIn noodles do dry out better if you’re planning to store them, but otherwise it doesn’t matter at all!
There are 2 methods of cutting the noodles:
One option is once the dough is rolled out, you can use a pizza cutter or knife to cut long strips of noodles. If you fail at cutting straight lines like I do - the next technique might work best.
Option two is to carefully roll the dough into a log (make sure you lightly flour the top so it doesn’t stick to itself), use sharp knife to cut slices, then shake out the noodles so they don’t stick to themselves as they dry.
If you’ve planned ahead, it’s best to leave the noodles to lay out on the counter to dry for about an hour before cooking. It’s also totally fine to just plop them right in a pot of simmering stock! They just tend stick together in the pot without some drying time.
To cook the noodles - drop into a pot of simmering chicken or beef stock in handfuls. If you drop a bunch at a time, they usually stick together so add in small amounts and keep stirring!
Cook until noodles start to float and aren’t doughy when you take a bite. How long that takes will depend on the thickness of your noodles, so you’re just going to have to wing it and trust me that you can’t mess this up and it’ll be fine!
My family likes to serve them over mashed potatoes. Is that normal? I have no idea if other families carb load that heavily, but that’s our holiday meal style!
These are also delicious tossed into chicken noodle or vegetable beef soup, and can be frozen then cooked for a quick meal another day! If you’re planning to freeze the noodles, let them dry on the counter until they are slightly crisp and won’t stick to each other before putting them in a bag or container.
They can also be fully dried and kept in the pantry, but that’s not something I’ve tried yet so can’t teach you that method!
My sister and her husband are coming to visit this weekend for “Thanksmas” and I am so excited to be in the kitchen with her, my Mom and my little girls making noodles! I predict it will look like the flour bag exploded…. Mimmie would be proud!
Does your family have favorite holiday meal recipes or memories? I would love to hear them!
Hope you enjoy a wonderful holiday season surrounding by family, friends and delicious food!
Want more recipes and stories from the farm delivered to your inbox? Be sure to sign up below so you don’t miss any of the randomness!
If you've been part of this farm community for awhile you know I'm in an in-between stage of life still working a full-time day job while we build the farm operation.
It has its positives and negatives, but for today I'll focus on the good parts. Steady income is a plus, health insurance is important, and I haven't had to buy a jacket for myself in about 5 years.
My job can require quite a few nights of overnight travel. It's hard to leave the family and farm, but my coworkers are some of my favorite people ever so we make even the most boring meetings fun-ish. Once in awhile we also eat some truly spectacular food.
On my latest trip we spent a few days in French Lick, Indiana. If I'm being completely honest, most of the food was terrible, but Sunday evening we had dinner at the hotel steakhouse and it was AMAZING.
We enjoyed a fancy meal while one member of our team educated us all on bitcoin, another provided way too many details about breeding basset hounds, 1/2 of us realized we haven't been doing our mileage reports correctly, and all tried to make sure we didn't use each other's silverware.
Don't laugh, but my menu choices were roasted brussel sprouts with pancetta, crab cakes, and potato chorizo soup. The Brussels and crab cakes were good, I was a nice person and shared them around the table, but this soup was perfection and I was a bit more stingy about sharing!
It was just a hint of spicy and creamy perfection and had potatoes and veggies.... I carefully analyzed it because I knew I would need to recreate it at home.
I think I succeeded and Jesse proclaimed it was his second favorite soup beat out only by chicken and rice. It got a little spicy for my typically adventurous 3 year old, or at least that was her excuse when she begged for a bowl of black beans for dinner instead. Yes, she's weird.
Ok so here's my recreation of the steakhouse soup. I’ve seen recipes that include corn too, which I think would also be delicious!
1 pound Grass Powered Pastured Chorizo
4 cups chicken or beef broth
1 cup heavy cream
3 tablespoons butter
About 4 potatoes
1 bell pepper
1 onion
1-2 carrots
2 cloves garlic
Salt, white pepper, powdered mustard or whatever other seasoning sounds good!
Dice potatoes, pepper, onion and carrots and garlic. Melt butter in the bottom of a Dutch oven or other heavy bottomed pan then sauté potatoes, peppers, onion and carrots. Add more butter or olive oil if needed. Once they are softened, add garlic for the last couple minutes.
Add thawed chorizo and break apart as it cooks.
Once Chorizo is cooked, add broth and any other dry seasonings. Allow to simmer about 15 minutes. A few minutes before serving, add heavy cream.
It’s amazing straight from the pot, but you could also top with sour cream, corn chips, fresh herbs, maybe even shredded or crumbled cheese.
I baked a loaf of quick crusty bread to go with it - perfection.
Hope this soup warms you on a chilly winter evening!
Want more recipes and randomness delivered to your inbox? Sign up below to be part of the fun!
I'm pretty sure the words "beauty" and "ground beef" have probably never been put together into the same blog post heading. We are making waves people!
But really, let's talk about ground beef. It's not a glamourous cut of meat. It's not like a nice thick cut steak or pork chop that even before its cooked is beautiful, or at least to us it is! What it does have going for it, is it's delicious and has an extreme amount of versatility.
Ground beef sometimes gets a bad rap for being "unhealthy". Truth is, it's all about the source and how that animal was raised. Grocery store grain-fed ground "beef" that's actually full of fillers and lots of fat is unhealthy. Locally raised, grass-fed ground beef is lean, full of nutrition, flavor, and isn't the villain grocery store ground beef is.
Side note - even "organic" grocery store beef was raised in a feedlot eating corn which was likely raised in China which means it's extremely UNlikely the corn was actually organically grown. Same with any organic meat in the grocery store. Don't get me started on the "free-range" label you see on grocery store chicken and eggs. Trust me.... it doesn't mean what you think. That's a post for another day.
Ok, sorry, off my soap box and back to ground beef.
Each steer only has so many steaks, which is unfortunate because steak is amazing and my child would definitely eat it every night for dinner. We will usually get some roasts (unless the butcher misreads our cut instructions and grinds them all into burger.... yes, this happened and I'm still sad), there are a few specialty cuts we can do, but the majority of the meat that comes back to us is ground beef. Eating locally, seasonally and being sure to utilize all parts of the animal means we embrace the beauty of ground beef and use it often!
Which is actually pretty easy. Along with chicken breast, it's one of my top go-to's when I have no dinner plan. So many meals start with ground beef, diced onion, bell pepper and garlic in a cast iron skillet. Start there and build your meal with what you have on hand!
Check out an earlier blog post on Ground Beef Cabbage Skillet which would be perfect to make right now since you can get all the veggies at the Farmers Market in season.
Here's a list of go-to meals I make throughout the year using ground beef. There are so many uses for ground beef besides making burgers! Again, these are not fancy meals (that's not my style at this stage of life) but they are quick, easy and toddler approved.
Spaghetti with Meat Sauce
Skillet Lasagna
Tacos with Homemade Seasoning - we love to really load up tacos with black beans, sautéed onions and peppers, fresh tomatoes, cilantro, corn, avocados.
Quesadillas - perfect for using up leftover taco meat!
Korean Beef with Rice and Broccoli
Spanish Rice
Meatloaf with Hidden Veggies - make extras and freeze before baking for an easy meal another night!
Ground Beef Stroganoff
Shepherds Pie
Chili Soup - freeze after cooking and heat up when you need an extra quick dinner!
Stuffed Peppers
I didn't try to write out recipes for all of these in this blog post... I thought that might get a bit too long winded. My recommendation would be to do a quick Google or Pinterest search if one of these recipes inspires you (that's my usual place for finding new recipes!) If you have any trouble let me know and I would be happy to talk you through my mostly made up from memory ways of making each of these dishes!
If you have a favorite ground beef recipe please share! Let's make dinner time easier for us all!
Dana
Want more recipes and meal ideas, plus stories straight from the farm? Join our email list and get a free recipe book to download!
As a family, we do our best to eat locally produced foods as much as possible. Summer is the easiest time of year to make this happen! We've discussed my failure at meal planning in prior blog posts, but I actually spent some time thinking through a couple meals I want to cook next week! Most ingredients are available from farmers market vendors and can easily be adapted based on what your family likes. Thought I would share in case they inspire meal ideas for you too!
One of the easiest meat cuts for me to plan around is boneless skinless chicken breast. When in doubt, I start thawing a package of chicken breast and make up a meal as I go! I try to avoid defrosting in the microwave, so if I forget to thaw overnight in the fridge I put the package in a large bowl of cool water or cover with water in the sink for about an hour.
These meals are definitely nothing fancy, but include lots of veggies readily available at the farmers market this time of year and are quick and easy for weeknight meals.
No fancy instructions here.... dice up chicken breast, a large onion, bell peppers and alternate on a skewer. Add salt, pepper, maybe some garlic salt, whatever spices you're feeling and grill until interior of chicken pieces reach 165 degrees. If you're feeling super inspired add some mushrooms, pineapple, whatever else you can spear! Sometimes I'll sprinkle teriyaki or BBQ sauce over the top when they are almost done cooking... this is one of those meals you can't mess up!
If you don't own a spriralizer to turn zucchini into noodles, it's a must have!!! Plan on about 1 to 1.5 zukes for each person you're feeding and make sure they are small enough to fit through the spiralizer.
Start by making your zucchini noodles, add salt and let them drain in a colander. Next, dice chicken breast, onion, green peppers, garlic, mushrooms, a yellow squash, whatever you want to add into your sauce! Saute in a skillet with olive oil until chicken is done and veggies are softened.
Remove veggies and chicken from the skillet and add in zucchini noodles. Saute for 5-10 minutes or until the noodles soften and the water they release evaporates.
Add veggies and chicken back to skillet. Add your tomato or alfredo sauce (can be freshly made from scratch, home canned, or store bought) - you won't find me judging your sauce choices! If you need to get really sneaky with your veggies, add them to the food processor and mix them all into the sauce.... the picky ones will never even know they are eating a mushroom.
Top with parmesan, serve with a salad or garlic bread!
What are some of your go-to recipes that use what's available at the farmers market this time of year? I'm always looking for new meal ideas!
Want to receive more recipes and meal ideas? Sign up for our email list below to have them straight to your inbox!
If anyone were to look at the cell phone call records for my Mom, Sister and I they would see that we talk to each other a ridiculous number of minutes each day. There are days my sister and I have already chatted for 1/2 an hour before she goes into work at 7am. In full disclosure she's in central time zone - she knows better than to expect me to be conversational before 6:30am! I don't even know what we talk about most of the time, but food, awesome things we have cooked, and trying to figure out what to make for dinner that day are definitely common topics!
When I mentioned to my Mom earlier this evening I was planning to use Sweet Italian chicken sausage in a chicken tortilla soup for dinner, I could hear the hesitation in her voice. My Mama is an AMAZING cook, but she is mostly a 'play it safe' recipe follower. Since I am definitely NOT all about accurate measurements, recipes or rule following, I tend to stress her out with my cooking adventures! It almost always turns out edible, right Mom?!
Part of the fun of eating seasonally, locally, based on what meat we have in the freezer, and living far from the grocery store is coming up with meals using what we have on hand. So far, I basically fail at meal planning so I've gotten pretty good at keeping pantry staples stocked so I can throw things together into a meal.
I found a winner with this recipe tonight! E baby proclaimed multiple times "good stoup mama!" as she stuffed food in her mouth. And no, that's not a typo. Soup is "stoup" in Eliza language. It's pretty adorable and I hope she never stops. She called strawberries "streebies" for the longest time and I am so so sad she has grown out of it!
1+ pounds Chicken Sausage (Sweet Italian, Chipotle or Tomato Basil would all be delish!)
1 onion chopped
1-2 cups of bell peppers chopped
2 cloves of garlic chopped
2 tablespoons olive oil
1 box or about 4 cups of chicken broth
1 can of black beans, rinsed
1 can of corn, drained
1 can of diced tomatoes with chiles or 2 fresh tomatoes and a hot pepper, diced
Handful of cilantro, chopped
salt, pepper, crushed red pepper, chili powder, cumin, tumeric (or a couple tablespoons of taco seasoning) to taste
Splash or two of lime juice
Avocado, shredded cheese, sour cream, tortilla chips or strips, slices jalapenos, etc. as toppings
Add chicken sausage, onion, peppers and garlic along with 2 tablespoons of olive oil to a dutch oven or large soup pot. Crumble chicken sausage into small pieces with burner on medium heat until cooked through. Add remaining ingredients and allow to simmer for about 20 minutes. Taste test and add spices until you're happy with it. Start with a 1/2 teaspoon or so of each and add from there. Toss in a couple splashes of lime juice and that's it! Top with whatever sounds good and enjoy!
I think this would also be good served with rice, or with rice cooked in the soup.... might try that next time!

The face of dinner approval.

0 points for presentation, but 10 points in taste category!
Want more recipes and stories from the farm delivered to your inbox? Sign up below and join our farm email community!
In my opinion, the beef roast is a seriously underappreciated cut of meat. Even way back in the day when I have no idea how we ever survived, Jesse and I both could make a decent roast.
When we first started making the shift to eating grass-fed beef, all I ever heard was how there was no fat, it was stringy, tough, lacked taste, enter all other misconceptions out there about grass-fed beef. So not true! A lean grass-fed roast has excellent flavor without ending up with a pile of fat and a little beef after cooking. It's one of our favorite meals, especially our 2-year-old, Eliza. The kid can eat an impressive amount of beef.
Not only are beef roasts super delicious, they are incredibly quick to prep and toss in the oven or slow cooker.
This roast is perfect for the crazy Wednesday when life is slightly out of control, you have nothing prepared or thawed and are already late for work. This happens more than I would like to admit.
Step 1 - run to freezer and pull out roast
Step 2 - take roast out of package and put in slow cooker. Make sure to pull off the thin little paper wrapper. Don't ask why I remind you of this.
Step 3 - add salt and pepper
Step 4 - cover the roast about 2/3 of the way up with water or beef broth. See rant below about store bought beef broth.
Step 5 - set the slow cooker on low and let it do it's thing for about 10 hours
If you're feeling extra ambitious or have a few minutes to spare, you can add in carrots, onions, potatoes, garlic. If not, make mashed potatoes and a vegetable at dinner time and enjoy!
This roast is a perfect option for a Sunday dinner when you have a little more time to enjoy cooking. It's still not a whole lot more involved, but the couple extra steps make this option a bit more "fancy" than a Crockpot Roast. Plus, the side dishes cook at the same time.
Less time cooking and fewer dirty dishes... a win-win in my book. You will need to plan ahead and let the roast thaw in the fridge for a day or two before cooking.
Step 1 - using a dutch oven, add a few tablespoons of oil (I typically use lard or butter) and let it heat up. I set the burner on medium.
Step 2 - take your thawed roast out of the package, pat dry with paper towels, rub salt and pepper onto all surfaces. Course salt is best, but use what you've got on hand.
Step 3 - once the dutch oven is hot, sear the roast just long enough to make a nice crust, about 2 minutes per side. Don't forget to use tongs and hold the roast up to sear the sides! Or don't. It really will be fine either way.
Step 4 - Once it’s seared, nestle that delicious roast into the dutch oven and cover about 3/4 of the roast in beef broth (either homemade or store bought - see rant below), water will also work, and add carrots, onions, potatoes, garlic, or whatever else you have on hand. Don't have all those? Just toss in what you do have. You can't screw this up, I promise. Adding a few splashes of dry red wine also adds great flavor!
Step 5 - let the roast cook at around 300 degrees for around 3 hours or until it's nice and tender. The timing will depend on the size of your roast and whether your oven temp is accurate. Mine is a guessing game.
Note - Don't be afraid to adapt or even leave things out of this recipe. I live 25ish minutes from the closest grocery store so for the most part if I'm missing some spice or ingredient the recipe calls for in small amounts, I just skip it and move on. Don't be scared! It will still be awesome.
Ok, short rant on store bought broth. A lot of store bought beef broth has "Caramel Color" as one of it's ingredients, even organic brands. As a person with sensitives to artificial colors, flavor, sweeteners, etc. this is super annoying. So if you're weird about that ingredient like I am, be sure to check the labels and avoid those brands. Rant over.
If you're interested in making your own beef broth, this is my highly non-complex recipe.
Roast your beef bones, sliced shank, beef for boiling, whatever cut you're using in the oven until they are browned. I toss everything in a slow cooker, cover with filtered water, add whatever veggies you have on hand, and let it hang out cooking on low until I have time to strain and package it. Sometimes that's overnight, sometimes it's a couple days.
I don't usually can broth, I just let it cool then put 2-4 cups in freezer bags and keep frozen until I need them. I would also recommend freezing some in ice cube trays for when you only need a small amount, but I haven't made that happen yet. You'll find me bashing a giant chunk of frozen beef broth against the counter to break off a few bits. It works, but it's not pretty.
Leftover roast can be used on sandwiches, in vegetable beef stew, in tacos, or frozen for later. This is an easy way to cook once then have lots of options for new meals throughout the week!
If you’re interested in having more recipes and stories from the farm delivered directly to your inbox, hit the button below and join our email farm community! There’s no time for spammy emails around here, email is just the best way we’ve found to keep you in the loop with what’s happening!
Happy Cooking Friends,
Dana